Part 6 in our series A to Z Considerations for Seating & Wheeled Mobility: A Quick Reference Clarifying Confusion Around CRT. See Part 1, Part 2, Part 3, Part 4, Part 5, Part 6, Part 7, Part 8, Part 9, Part 10, Part 11, Part 12, Part 13, Part 14, Part 15, Part 16, Part 17, Part 18, and Part 19.
This week, we will begin looking at the formal “mat assessment” and the “atypical” physical components of the wheelchair evaluation you may not feel as comfortable or familiar with. Again, do NOT worry: while these items may feel a bit overwhelming at the surface, once we dig into them, you will find that you are fully capable of incorporating them into your evaluation process! And, over time, you will become confident and efficient in this seemingly unfamiliar territory.
THE FEAR-PROVOKING MAT ASSESSMENT
At this point, you have likely completed your “typical” assessment of the patient, looking at strength, muscle tone, skin integrity, etc., and you may already have your patient supine or sitting on the “mat.” If not, now is the time to have your patient transfer or assist your patient in transferring onto a firm, flat surface in order to perform the next steps in completing the physical portion of the evaluation. I am going to refer to this firm, flat surface as the “mat.” As therapists, when we hear the term “mat,” we picture those firm queen-sized tables of pleather-covered foam. While this will certainly suffice, the “mat evaluation” can be completed on any firm, flat surface. I, too, live in the real world and realize that this type of surface may not always be available; just do your best! If you are in a home setting, the client’s mattress may be as good as it gets.
When assessing for mobility equipment, the mat assessment consists of two sections: The supine evaluation and the sitting evaluation.
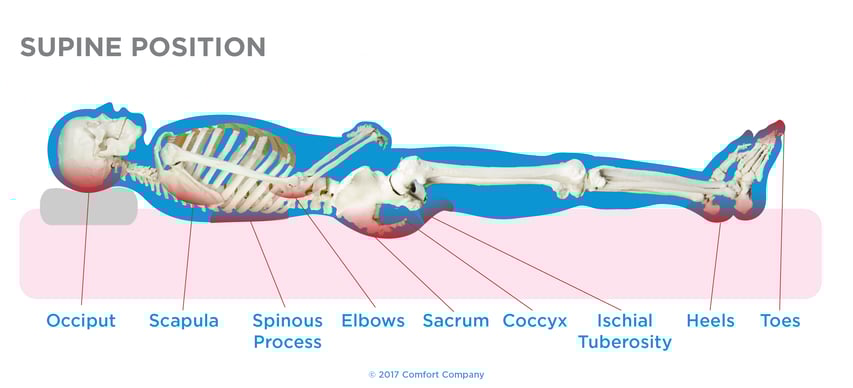
THE SUPINE EVALUATION
The supine section of the mat assessment is the portion of the physical evaluation where you can most accurately assess the pelvis, extremities, trunk, and neck in supine without the effects of gravity and can truly see the flexibility of the body and assess the client’s potential for midline/upright posture in a seating system. Removing the effects of gravity allows us to evaluate specific ROM deficits and take accurate ROM measurements as well as determine any existing postural abnormalities and assess whether these are fixed (non-reducible) or flexible (reducible). For those of you not familiar with or comfortable with the common postural abnormalities seen in wheelchair seating and mobility, click this here for this information.
| *Tip: Consider waiting to assess ROM altogether until you have the patient in the supine position to avoid repeating steps and to become more efficient in your wheelchair evaluation. |
During the supine assessment, be sure to look at the:
Pelvis: Assess the pelvis in all planes, looking at anterior and posterior pelvic tilt, lateral tilt, and rotation. Are there limitations? If so, describe the limitations, i.e. the presence of an obliquity, where one side of the pelvis is lower than the other in the coronal plane.
Lower extremities: Be sure to look at hip flexion, ABDuction and ADDuction, internal and external rotation, knee flexion and extension, and ankle dorsiflexion and plantarflexion, inversion and eversion. Take and record measurements of any limitations.
| *Tip: When assessing hip flexion ROM, place your thumb on the ASIS and your pinky on the PSIS (or one hand on each, if your hands are too small to reach around the pelvis) while assessing hip flexion. When the pelvis starts to tip into posterior pelvic tilt as you bring the knee toward the chest, you have reached the end of the available hip flexion ROM. |
Upper extremities: Assess shoulder flexion and extension, straight and horizontal ABDuction and ADDUction, internal and external rotation, elbow flexion and extension, forearm pronation and supination, and wrist flexion and extension, radial and ulnar deviation, and finger flexion and extension. Take and record measurements of any limitations.
Trunk: Assess lordosis, kyphosis, and look for the presence of scoliosis. Record any abnormalities.
Neck: Assess flexion, extension, lateral flexion left and right, and rotation left and right. Record any limitations.
So, now you are finished with the supine portion of the formerly fear-provoking “mat assessment”! That wasn’t so bad, was it? Join me back next week, and we’ll go through the seated section of the mat assessment. Then, you will be ready to begin measuring for the mobility equipment!

Resources: Cole, Elizabeth, MSPT, ATP. “Steps in the Provision of Wheeled Mobility and Seating- Part 1.” U.S. Mobility; www.VGM.com.

Lindsey Sharpe, PT, DPT
Clinical Education Manager Rehab Division