Part 7 in our series A to Z Considerations for Seating & Wheeled Mobility: A Quick Reference Clarifying Confusion Around CRT. See Part 1, Part 2, Part 3, Part 4, Part 5, Part 6, Part 7, Part 8, Part 9, Part 10, Part 11, Part 12, Part 13, Part 14, Part 15, Part 16, Part 17, Part 18, and Part 19.
Last week we discussed the supine portion of the mat assessment, and now you are ready to complete the next part of your seating evaluation! Once you have completed the supine portion of the mat assessment, have the client sit up or assist the client into a sitting position at the edge of the mat. And remember to:
- Make sure the client’s feet are supported on the floor and are as flat as possible. You may need to place a step stool or box under the client’s feet, depending on the height of the surface he is sitting on, in order to achieve proper foot support.
- Make sure the client has good support under the thighs and is not scooted too far forward on the mat as this will impact sitting balance and the position of the pelvis, possibly resulting in inaccurate information.
Sitting re-introduces the downward pull of gravity and provides information regarding its effects on balance and posture. As you completed the supine portion of the mat assessment, you looked at ROM and flexibility and determined any limitations. You already figured out whether these limitations are fixed (non-reducible) or flexible (reducible), and, now, you will begin to look at what and where support is needed in order to achieve the most neutral and/or functional posture for the client.
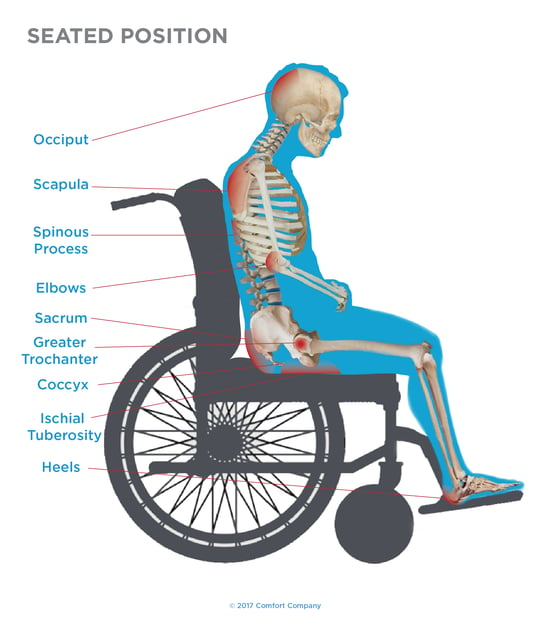
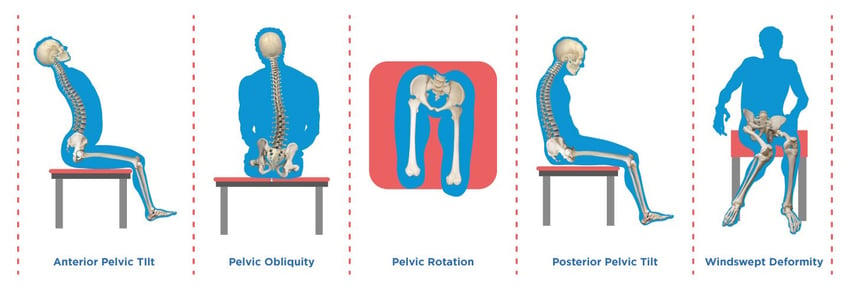
This is the time to look at the pelvis, lower extremities, upper extremities, trunk, and neck using your hands to simulate the possibilities the seating system can provide. Here are just a few things to consider:
- Does the client require support in sitting? If so, how much support is required?
- What is the pelvis doing in sitting? Does it collapse into a posterior pelvic tilt, for example?
- What happens at the lower extremities, trunk, and neck when you correct this, if possible?
- If there is a flexible (reducible) scoliosis present, how much support/opposing force is required to correct this?
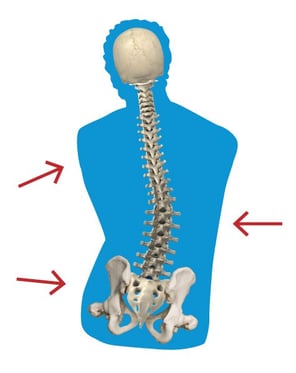
Correcting Flexible Scoliosis
- And, at what vertebral levels do these opposing forces best correct the scoliosis?
- Can the client perform the necessary functional tasks in the corrected or optimal posture?
- How does the corrected or optimal posture effect the ability to interact with the environment?
- What effect, if any, does to corrected or optimal posture have on respiration, balance, comfort, and sitting tolerance?
| *Tip: This is where it gets fun! Use your hands to simulate the support at the trunk and pelvis you hope the wheelchair and its components will provide. See how placing your hands specific places can correct abnormal postures and facilitate the optimal postural and functional position for your client. Then, you and the ATP will select components that accomplish what you were able to achieve with your hands. |
Combining all this information will guide your choices regarding the most appropriate equipment for your patient. You DO NOT need to know all of the products on the market. REMEMBER: you are not alone in this! Your ATP will help you synthesize all of this information and guide you when it comes to equipment selection and availability to address the specific needs of your client.
Now that you have an idea of the equipment options you will select to accomplish your goals, it is time to take measurements! Join me next week to learn what to measure and how to properly measure in order to get the best fitting equipment possible!
Resources: Cole, Elizabeth, MSPT, ATP. “Steps in the Provision of Wheeled Mobility and Seating- Part 1.” U.S. Mobility; www.VGM.com.
Hand Icon made by Smashicons from www.flaticon.com

Lindsey Sharpe, PT, DPT
Clinical Education Manager Rehab Division
