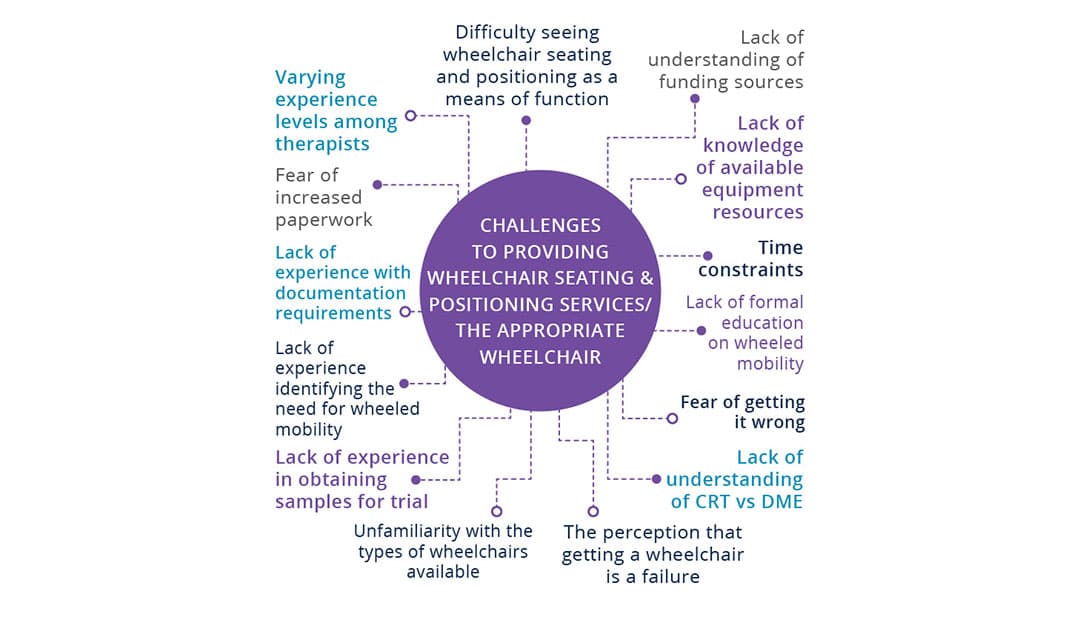
This guide is intended to demystify the provision of wheelchair seating & positioning for healthcare professionals.

This guide is intended to demystify the provision of wheelchair seating & positioning for healthcare professionals. The aim is to assist healthcare professionals in achieving optimal individualized wheelchair seating to meet the goals for each client by:
This guide was created using process and funding guidelines for the United States including Medicare coding terminology. Therefore, some terms such as K0005 and Ultra Lightweight Manual Wheelchair, are considered to be interchangeable throughout. This guide is meant to be a comprehensive introduction to manual mobility. For advanced learning opportunities, visit the education tab at permobilus.com
1. Patient is non-ambulatory
2. Demonstrates decreased safety with ambulation or is at risk for falls within the home. Ask about history of falls; perform an objective balance assessment, e.g. BERG Balance Scale (BBS), Dynamic Gait Index (DGI), Timed Up and Go (TUG)
3. Requires assistance for ambulation within the home and wheeled mobility would allow independence
4. Requires increased time for ambulation within the home. Perform a gait speed test; think about performing ADLs in a reasonable amount of time
5. Unable to consistently ambulate throughout the day in the home, which affects their ADLs. Look at a 24-hour period
6. Their current wheelchair is in disrepair or not meeting their needs for mobility or postural support.
Here are scenarios where wheeled mobility could significantly increase a person’s quality of life:


Has knowledge of their own body, functional needs, and what works best for them in their day-to-day lives

Determines the medical need for seating and wheeled mobility

Adds wound care expertise

Provides clinical knowledge of the body, understands optimal postures for function, and patient advocacy

Must go through an in-depth certification process
Has specialized knowledge of complex rehab products/equipment, qualification requirements, is competent in analyzing the needs of consumers with disabilities, aids in the selection of appropriate assistive technology for the consumer's needs, and provides training in the use of the devices

Offers knowledge of their products, clinical applications, integration of their products with other technology, and all the pros/cons of products for various patient presentations
It is critical for health care professionals to develop a relationship with a reputable dealer who employs an ATP.


Addressing equipment issues can sometimes result in upright posture. However, in many other cases, there are also physical limitations that prevent the client from maintaining or even achieving this “ideal" posture. In these cases, you need to identify the “client-related” issue(s) in order to choose the best seating solutions. This requires a seating evaluation.
Don’t let the term “Seating Evaluation” scare you!! In addition to your typical evaluation, you MUST assess and document the following:
Measurements of doorways, table, height, bed height, stairs, etc
Document what kind of car they drive and/or ride in
How do they currently get around to perform their daily tasks? Be descriptive (efficiency, ability)
Describe ALL current equipment and the condition of each
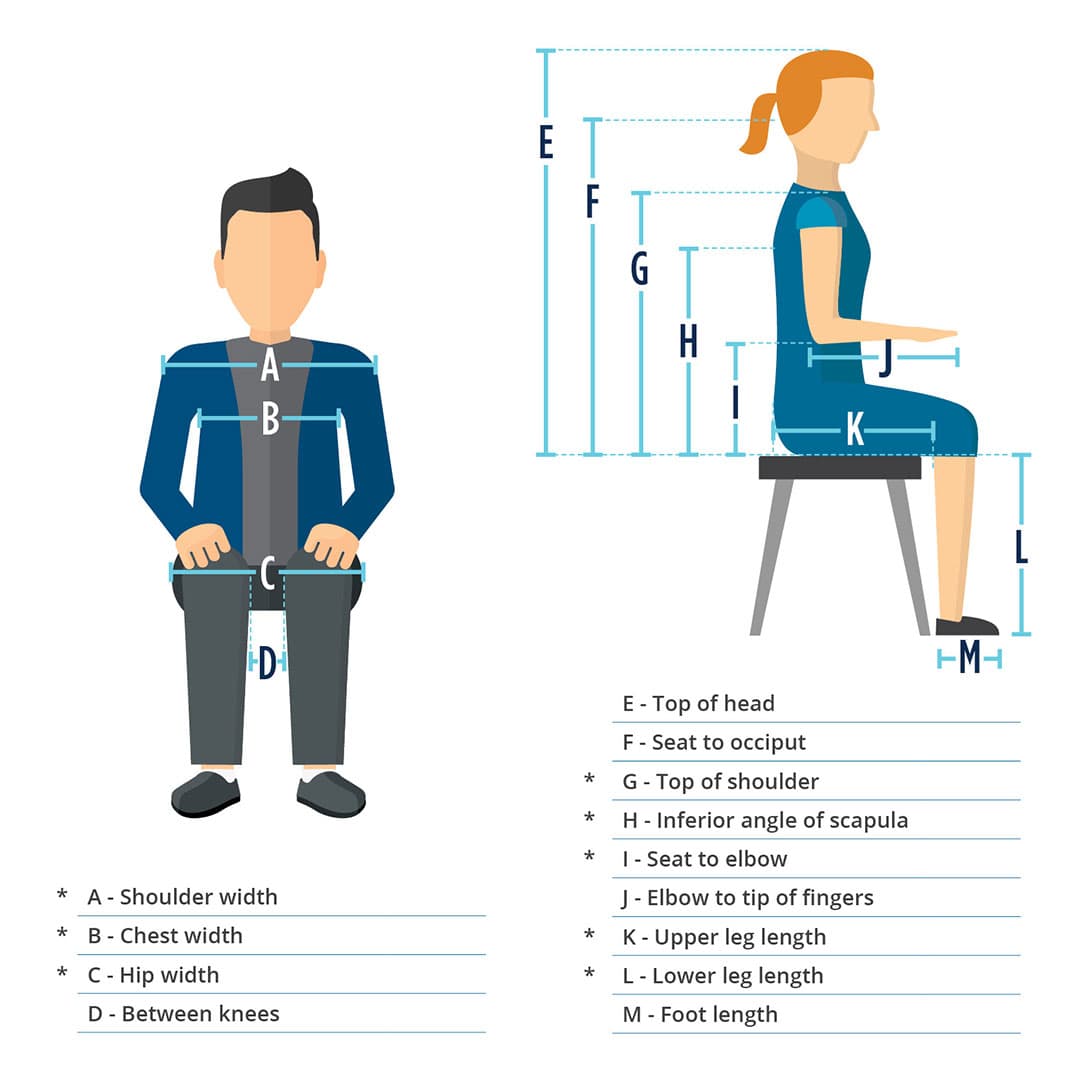
Complete the 8 key patient measurements to ensure proper fitting equipment
Explain why a lesser product will not work and how the selected product increases independence in the home
When documenting your evaluation, be as descriptive as possible. Describe their posture while sitting, what posture is required for optimal independence with ADLs, and how the proper equipment can maximize function and minimize pain.
Is there a postural abnormality? Decide if that postural abnormality is reducible or non-reducible. Should your goal be to correct or accommodate it?


1. All measurements should be taken while sitting on a firm, flat surface in the posture the therapist is trying to accomplish for the patient.
2. Measure using a hard measuring tape, not one that can bend and wrap around the patient’s body. This will lead to measurement errors, adding circumference or length.
3. All measurements should be taken straight across the body.
4. Use a measurement form to remind you of the measurements needed and to record them properly.
Don't forget to include excess tissue in all measurements and measure the client in their ideal posture that is realistic for maintaining throughout the day.
Don’t forget to look for limited hip range of motion and tight hamstrings during the evaluation. They are often the culprits of poor pelvic positioning!
You will need to perform the following required measurements when choosing the best fitting equipment. Click here to download an easy-to-use measurement form to document your findings in the field.
Remember to have patient sitting on a flat, firm surface for accurate measurements
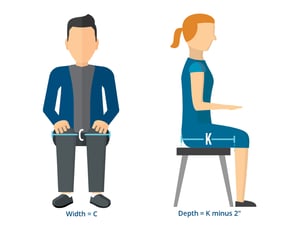
How to measure SEAT WIDTH (C): Measure from widest point to widest point of the hips, including all residual tissue
How to measure SEAT DEPTH (K): Measure from the buttocks, including any excess tissue, across the femur to the popliteal fossa
Then subtract 2"
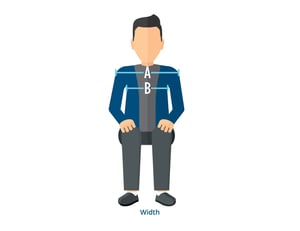
How to measure SHOULDER WIDTH (A): Measure from humeral head to humeral head, incorporating excess tissue
How to measure CHEST WIDTH (B): Measure from axilla to axilla. This measurement helps determine back support width.
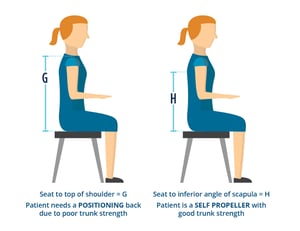
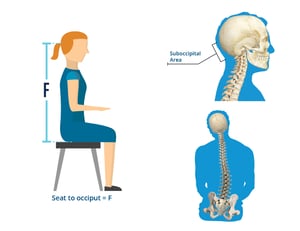
How to measure HEIGHT (G or H): Measure the patient in the position you are striving to achieve
* Measure both sides L & R in case of scoliosis and/or a pelvic obliquity
* An average back support height for a self propeller is 16” tall, unless you have an active client who requires more freedom of movement and is more independent.
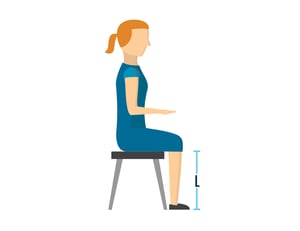
How to measure LOWER LEG LENGTH (L): Measure from the top of the patient's seat (top of cushion if applicable) to the floor
Measure with feet on floor (with shoes that they normally wear or barefoot if they do not normally wear shoes) and measure bottom of foot/shoe to popliteal fossa
* There must be a 2” clearance between foot plate and floor to clear thresholds.
* If providing the patient with a new cushion, remember to consider the thickness of the desired cushion and adjust STFH accordingly.
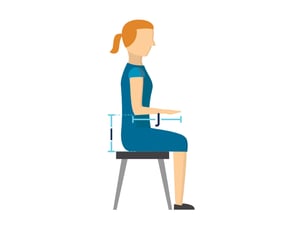
How to measure ARM HEIGHT (I): Seat your patient with shoulder in neutral and elbow bent at his or her side to 90°
Measure from top of seat to under forearm/elbow
How to measure ARM LENGTH (J): If patient needs a specialized arm length, measure from end of elbow to where the therapist wants the desired replacement arm support to end
* Measure both side in case of pelvic obliquity/scoliosis. This will justify the need for a model of wheelchair with adjustable height arm rests.
There is no miracle formula for fitting a patient for a proper head support
* Head support hardware that has offset capabilities accommodates patients with head position out of midline.

For more information click here to contact your local representative.
All contents © copyright 2020 Permobil. All rights reserved.